
DIY Reading Nook: Step-by-Step Budget Build Guide
DIY reading nook projects have exploded in 2026 — Pinterest searches for “reading nook ideas” surged 245% year-over-year, while Zillow’s 2026 Home Trends Report found reading nook mentions in property listings rose 48% (Zillow, 2026). Homeowners are reclaiming dead corners, underutilized bay windows, and awkward closets to build micro-escapes that deliver daily comfort without a major renovation. In this guide, you will find every tool, material, cost figure, and pitfall you need to build a cozy reading nook in a single weekend — for as little as USD 50.
Why a DIY Reading Nook Is 2026’s Smartest Home Project
The numbers tell the story clearly. According to Zillow’s 2026 Home Trends Report, reading nooks have overtaken juice stations and marble sinks as sought-after features in home listings, signaling a broad shift toward cozy, analog retreats (Zillow, 2026). Designers describe this as the “micro-escape” movement — the desire for a small, intentional corner that offers genuine comfort without committing to a full renovation. A well-built DIY reading nook delivers exactly that.
What makes a DIY reading nook so appealing compared to buying a premade chair or bookcase? Three things: the ability to fit an exact space, the option to build in hidden storage, and the lasting satisfaction of making something yourself. Family Handyman has long championed built-in benches as one of the best beginner-to-intermediate DIY projects precisely because the construction is straightforward — a frame, a platform, a cushion — and the payoff is immediate (Family Handyman, 2025). Whether you use a bay window, an understairs alcove, or a plain bedroom corner, the same principles apply.
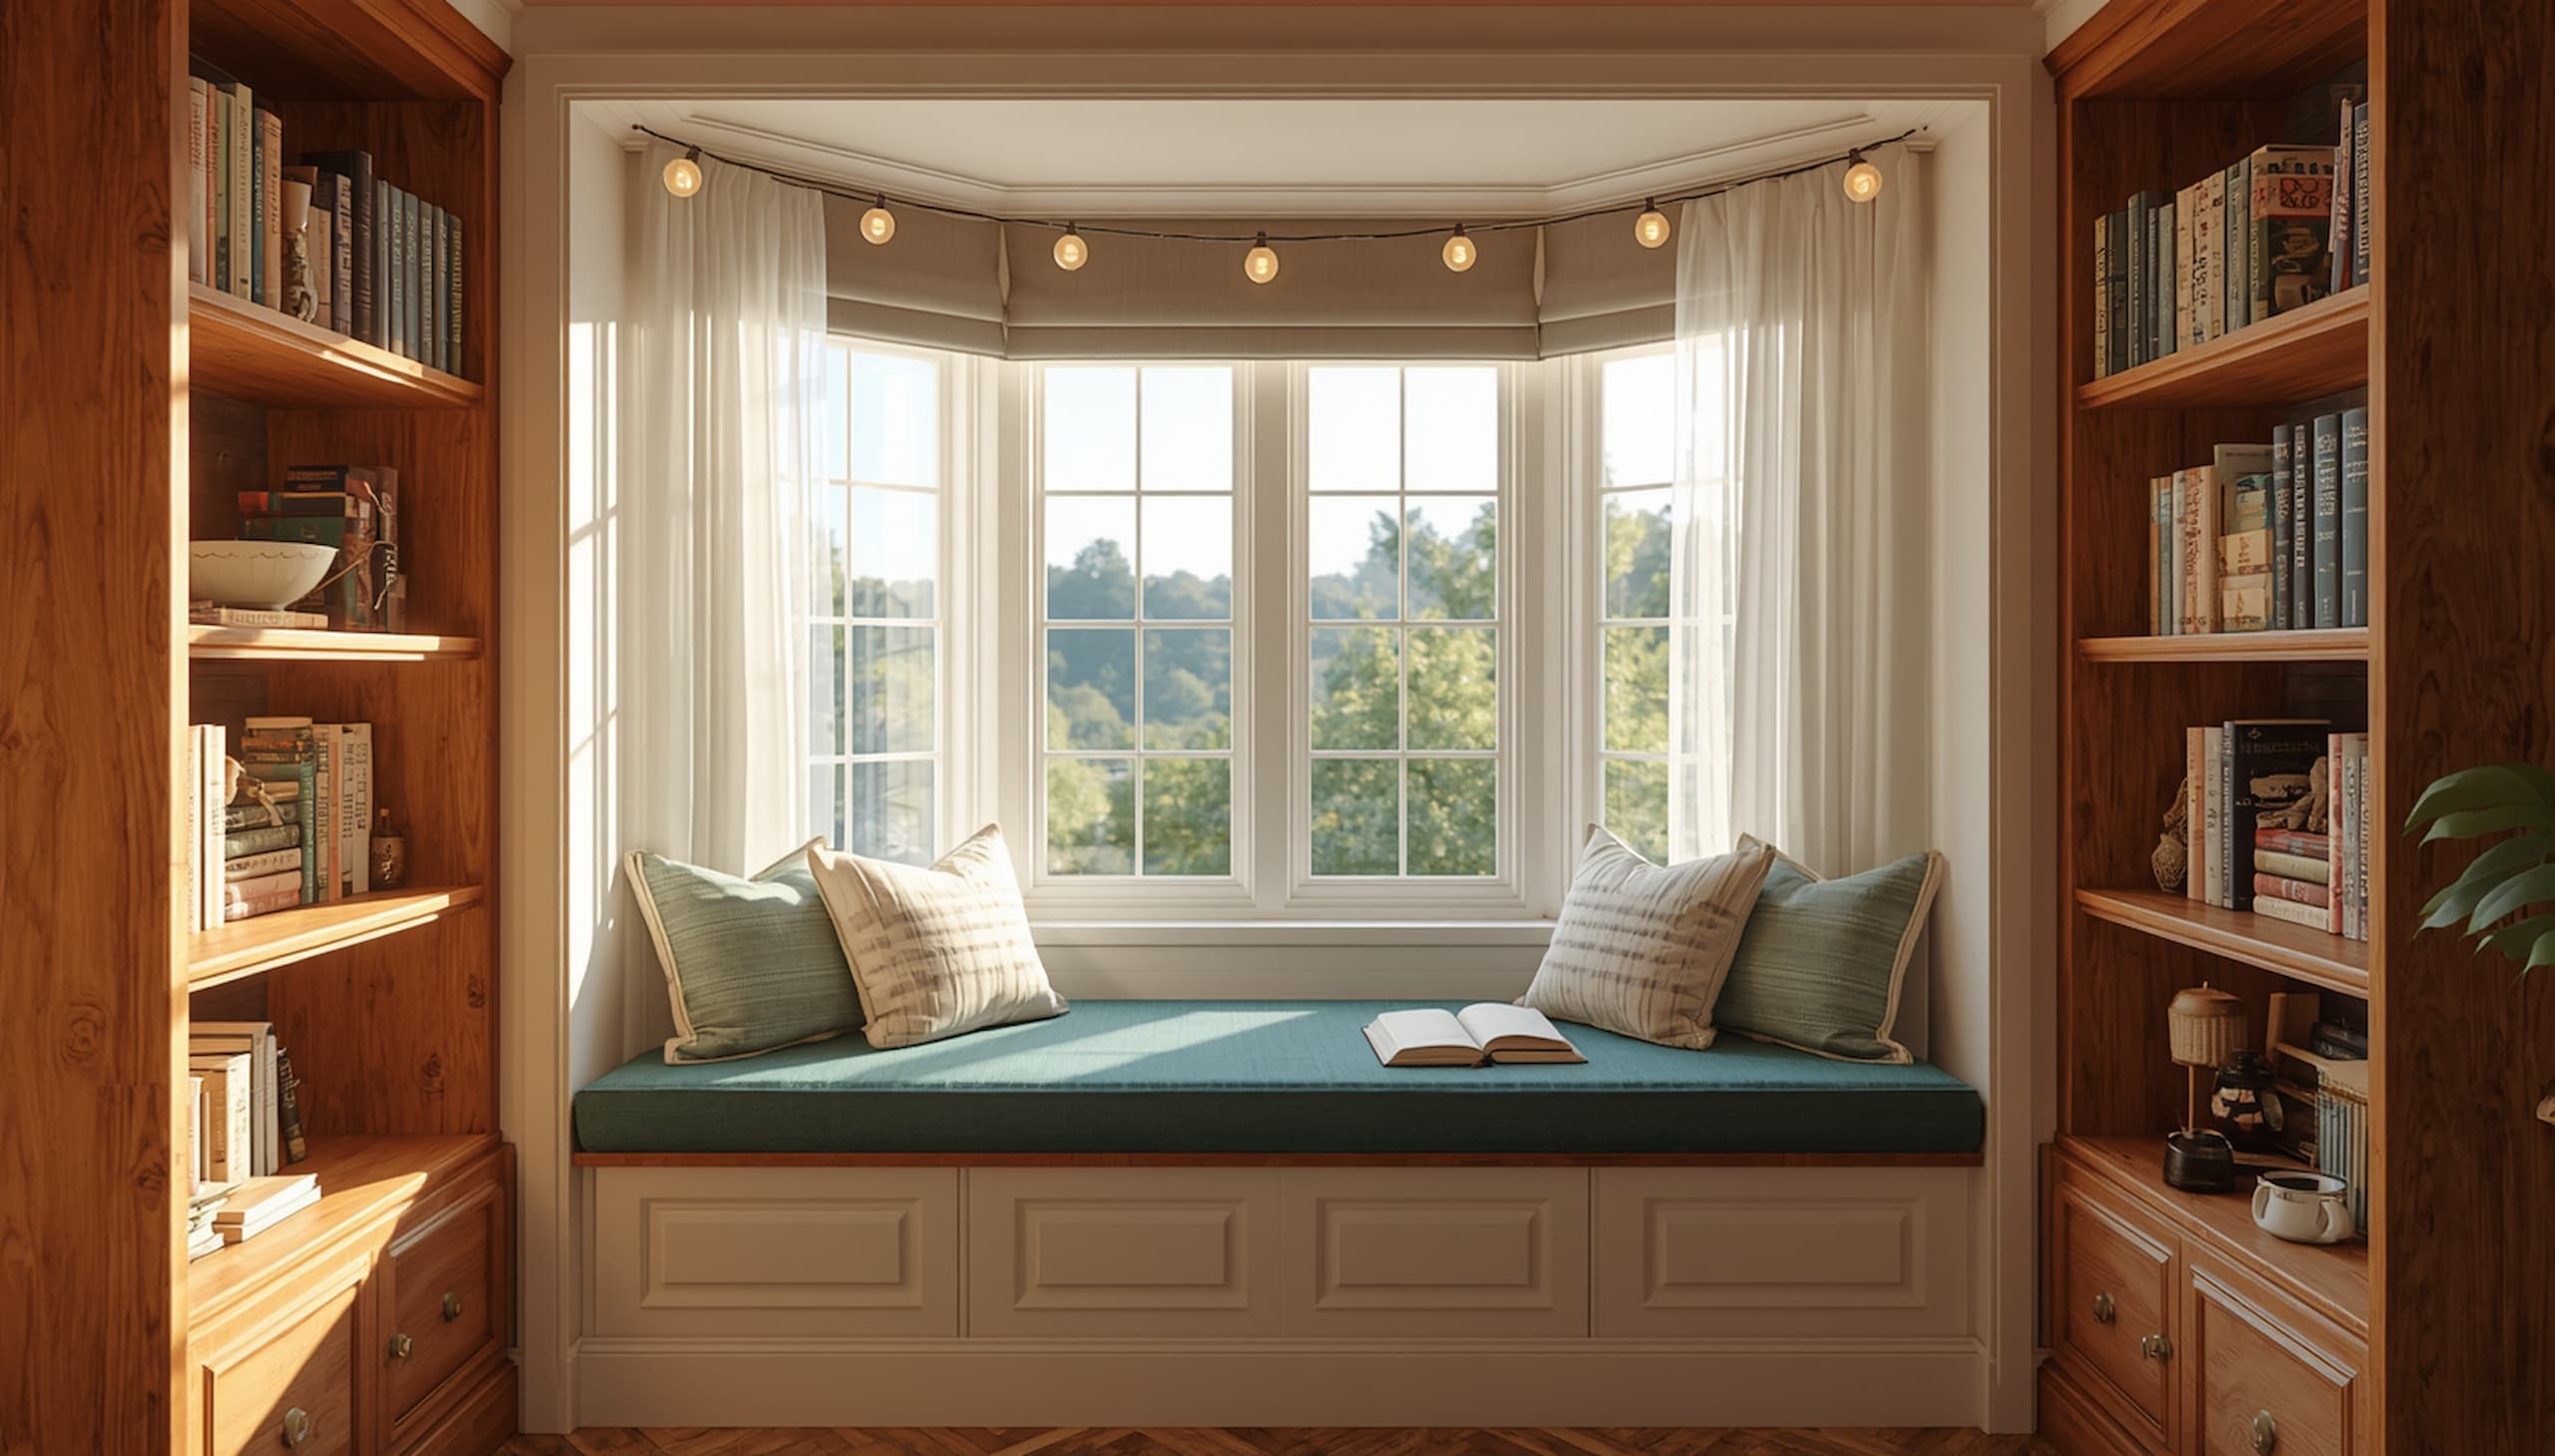
Best Spots in Your Home for a Cozy Reading Nook
The most popular location for a DIY reading nook build is a bay window, but it is far from the only option. The space under a staircase is one of the most underrated spots in any home: the angled ceiling creates a natural cocoon effect that feels enclosed and private, even without walls on all sides. A spare closet — especially one that is shallow or awkwardly shaped — converts remarkably well into a fully enclosed reading alcove with shelving, a cushioned bench, and integrated LED lighting. For renters who cannot permanently modify walls, a corner armchair flanked by two tall bookcases achieves the same enclosed feeling without a single nail in drywall. Browse our complete Home and DIY category for additional project inspiration tailored to renters and homeowners alike.
When choosing your spot, pay attention to seat depth. Design guides consistently recommend a minimum of 24 inches so an adult can sit cross-legged or pull their knees up comfortably (This Old House, 2025). A spot that feels generous at 18 inches will feel cramped after ten minutes of actual reading. Test the location by sitting on a cushion in that exact spot for ten minutes before committing to any cuts or purchases.
Materials and Tools Needed for Your DIY Reading Nook
A basic DIY reading nook window bench requires only a handful of materials, most of which are available at any Home Depot or local lumber yard. The core structure consists of 2×4 lumber for the frame, 3/4-inch plywood for the seat platform and any side panels, and a piano hinge if you plan to add under-seat storage. According to detailed build guides compiled by Family Handyman, most window bench projects run between USD 80 and USD 250 in raw materials when built from scratch (Family Handyman, 2025).
Your tool list does not need to be extensive. A circular saw or miter saw handles all lumber cuts. A drill/driver with bits handles screws and pocket holes. A level, tape measure, and stud finder round out the essentials. If you plan to add a Kreg jig for pocket-hole joinery — a technique highly recommended by This Old House for bench builds — budget an additional USD 35 to USD 50 for the jig, which you will reuse on future projects (This Old House, 2025).
Complete Materials List for a Standard Window Bench Reading Nook
The list below covers a standard 5-foot window bench with under-seat storage — the most common DIY reading nook configuration. Adjust quantities to match your exact seat dimensions before purchasing. Standard seat height is 18 to 20 inches from the floor, which aligns with a typical chair seat and makes it comfortable for adults of most heights. Lumber dimensions are nominal; always measure actual dimensions at the store before planning your cuts.
| Material | Quantity | Approx. Cost (USD) |
|---|---|---|
| 2×4 lumber (8-foot lengths) | 6 boards | USD 24 to USD 36 |
| 3/4-inch plywood (4×8 sheet) | 2 sheets | USD 50 to USD 80 |
| 4-inch foam cushion insert | Cut to fit | USD 30 to USD 60 |
| Upholstery fabric (2 yards) | 2 yards | USD 15 to USD 40 |
| Piano hinge (for lid storage) | 1 length | USD 8 to USD 15 |
| Wood screws, sandpaper, wood filler | Assorted | USD 10 to USD 20 |
| Paint or stain | 1 quart | USD 12 to USD 22 |
Step-by-Step: How to Build a DIY Reading Nook
Follow these steps for a standard window bench reading nook build. This sequence covers a built-in bench seat with under-seat storage, the most popular DIY reading nook format. Estimated build time is one to two days for a confident beginner. If this is your first carpentry project, budget an extra half day for measuring, test-fitting, and corrections before any permanent fastening.
Step 1 — Measure and Plan Your Reading Nook
Measure the width, depth, and height of your chosen nook location twice before purchasing any lumber. Write your measurements on a sketch showing the front face, the seat top, and any side panels. Confirm your seat height target: 18 to 20 inches from the finished floor is the standard for adult comfort (This Old House, 2025). If you plan to add a cushion — which is strongly recommended — subtract the cushion thickness (typically 4 inches) from your platform height before building the frame. A platform built to 16 inches with a 4-inch cushion delivers an 18-inch seated height.
Mark the stud locations on the wall where the bench will attach using a stud finder. Screwing your frame into studs rather than just drywall is critical for load-bearing stability. A bench seat must support at least 250 to 300 pounds to pass a basic safety standard, and drywall anchors alone will not provide that (Family Handyman, 2025).
Step 2 — Build the Frame
Cut your 2×4 lumber to form a rectangular base frame matching your floor dimensions. Build two identical side frames — each one a rectangle of 2x4s with a cross-support in the middle — then connect them with horizontal 2×4 stretchers across the front and back. Fasten everything with 3-inch wood screws, using a Kreg jig and pocket-hole screws for the joints that need to be flush and invisible from the front face. The result should be a rigid, flat-topped box sitting on the floor. Shake it before continuing — it should not wobble at all.
Screw the back of the frame directly into the wall studs you identified earlier. This single step transforms a freestanding box into a permanent built-in, adding enormous rigidity and ensuring the bench cannot tip forward under load. Use 3-inch screws through the rear 2×4 frame member and into the studs.
Step 3 — Add the Plywood Platform and Front Panel
Cut a piece of 3/4-inch plywood to fit the top of the frame as your seat platform. If you are adding a storage lid, attach it to the back of the frame using a piano hinge so it lifts from the front. This hidden storage is perfect for blankets, extra pillows, and charging cables. Cut a front-face panel from your second plywood sheet and attach it to the front of the frame to conceal the 2×4 structure. Sand all edges thoroughly — 80-grit first, then 120-grit — and fill any screw heads with wood filler before painting.
Paint or stain the entire unit now, before the cushion goes on. Two coats of a water-based paint in a semi-gloss or satin finish works best for a surface that will see daily use. For style inspiration matched to 2026’s biggest interior trends — including Japandi, dark academia, and Grandmacore aesthetics — visit our Lifestyle section for color palette guides and decor pairing ideas.
Step 4 — Make and Install the Cushion
Cut a 4-inch-thick high-density foam insert to match your seat platform dimensions. Wrap it tightly in your chosen upholstery fabric, pulling the fabric taut on the underside and securing it with a staple gun every 2 to 3 inches. The fabric you choose defines the entire visual identity of the DIY reading nook — durable options include canvas, linen-blend, and outdoor-grade fabric, which resists staining and holds up to everyday use far better than decorative indoor fabrics.
The finished cushion can rest directly on the plywood platform or be secured with self-adhesive hook-and-loop fastener tape on the underside for a non-slip hold that still allows removal for washing. Add throw pillows, a small wall-mounted reading light at eye level, and a narrow floating shelf within arm’s reach. These finishing touches complete the reading nook build and define it as its own cozy zone within your room.
Common Mistakes to Avoid When Building a Reading Nook
Most DIY reading nook builds that fail do so because of measurement errors in the early planning stage, not because of skill gaps in the actual construction. Getting the dimensions wrong before any cutting begins costs time and materials. According to Family Handyman’s expert build guidance, the three most common errors are an insufficient seat depth, improper wall attachment, and choosing the wrong foam density for the cushion (Family Handyman, 2025). All three are easy to avoid with five minutes of planning.
Another common oversight is ignoring natural light. A DIY reading nook placed in a spot with no access to natural light — or directly under a bright overhead fixture that creates glare — will simply not get used, regardless of how well it is built. Position your nook where morning or afternoon light can reach it naturally, and supplement with a warm-toned, dimmable task light rather than a cool-white LED, which creates eye fatigue during long reading sessions.
Mistakes That Ruin Comfort and Longevity
Using low-density foam (anything under 1.8 lb per cubic foot) for the cushion is a mistake that reveals itself within weeks. Budget foam compresses quickly and creates an uneven, uncomfortable seat that discourages use. High-density foam rated at 2.0 to 2.5 lb per cubic foot holds its shape for years and is worth the additional USD 15 to USD 30 upfront cost. This Old House recommends high-density foam for any window bench cushion that will see daily adult use (This Old House, 2025).
Skipping the stud-finding step and screwing the frame into drywall alone is a structural safety error that can lead to the bench pulling away from the wall under load. Always locate and use studs for any wall-attached built-in, even if it means adjusting your bench position by a few inches to align with stud spacing. Similarly, do not rely on wood glue alone at load-bearing joints — combine glue with screws or pocket-hole fasteners for every structural connection in the frame.
Cost Breakdown: What Does a DIY Reading Nook Really Cost?
One of the most compelling aspects of building a DIY reading nook is the wide cost range. A basic cushion-and-pillow corner setup using furniture you already own can cost as little as USD 50. A mid-range window bench build with plywood, lumber, and a quality cushion runs USD 150 to USD 350. A full built-in alcove with surrounding bookshelves, integrated lighting, and premium upholstery can reach USD 1,200 — still a fraction of a contractor-built custom nook, which routinely runs USD 2,500 to USD 5,000 or more (D and G Flooring, 2026). Materials for a built-in typically run USD 500 to USD 1,200 for lumber, plywood, and trim when adding full shelving units on both sides (D and G Flooring, 2026).
The table below breaks down three common DIY reading nook build tiers so you can match a budget to a scope before heading to the hardware store. All prices reflect 2026 Home Depot and lumber yard averages for the continental US market.
| Build Tier | What Is Included | Estimated Cost (USD) | Skill Level |
|---|---|---|---|
| Budget Corner Setup | Floor cushion, throw pillows, existing chair or floor pouf, small side table | USD 50 to USD 100 | No tools required |
| Window Bench Build | 2×4 frame, plywood seat, storage lid, foam cushion, paint | USD 150 to USD 350 | Beginner to intermediate |
| Built-In Alcove with Shelving | Framed bench, flanking plywood bookshelves, trim work, integrated lighting, premium cushion | USD 500 to USD 1,200 | Intermediate |
| Contractor-Built Custom Nook | Full custom built-in with millwork, electrical, professional upholstery | USD 2,500 to USD 5,000+ | Hire a pro |
Where to Save and Where to Spend on Your Reading Nook Build
Save money on the structural lumber — standard 2×4 construction-grade boards are identical in function to premium-priced alternatives for a bench frame that will be entirely hidden. Save on paint by using an interior trim paint in a quart size rather than gallons, since the surface area of a bench is small. Spend on the foam insert. High-density foam is the one component that directly determines how much you actually use the DIY reading nook. A USD 20 upgrade from 1.5 lb to 2.0 lb foam density adds years of usable life to the cushion. Also worth spending on: a dimmable reading light. A well-placed USD 25 wall-mounted LED puck with a warm color temperature transforms a bench into a genuinely inviting reading space after dark.
Frequently Asked Questions
How much does it cost to build a DIY reading nook?
A DIY reading nook can cost as little as USD 50 for a simple cushion-and-pillow corner setup using items you already own. A mid-range window bench reading nook build — with 2×4 framing, plywood, a storage lid, and a quality foam cushion — typically runs USD 150 to USD 350 in materials (D and G Flooring, 2026). A full built-in alcove with bookshelves and integrated lighting runs USD 500 to USD 1,200, which is still significantly less than a contractor-built version at USD 2,500 or more.
What is the best location for a reading nook in a small home?
The best location for a DIY reading nook in a small home is the space under a staircase, a bay window with at least 24 inches of depth, or a shallow closet that can be converted into an alcove. Under-stairs nooks are particularly effective because the sloped ceiling creates a naturally enclosed, cocoon-like atmosphere (This Old House, 2025). For renters, a corner flanked by two tall bookshelves achieves a similar enclosed feel without any permanent wall modifications.
What type of foam is best for a DIY reading nook cushion?
For a DIY reading nook bench cushion, use high-density upholstery foam rated at 2.0 to 2.5 lb per cubic foot with a thickness of at least 4 inches. This density holds its shape under daily adult use and lasts significantly longer than budget foam, which compresses within weeks. This Old House recommends high-density foam for any window seat that sees regular use (This Old House, 2025). For outdoor or high-traffic reading nooks, consider a quick-dry foam core wrapped in an outdoor-grade fabric for easier cleaning.
Can a beginner build a reading nook without professional help?
Absolutely. A window bench-style DIY reading nook is one of the most beginner-friendly built-in projects available, requiring only a circular saw, a drill, and basic measuring skills. Family Handyman consistently ranks bench seat builds as top beginner-to-intermediate projects because the construction involves simple rectangular cuts with no complex joinery (Family Handyman, 2025). A confident first-timer can complete a basic DIY reading nook in a single weekend. Start with the window bench tier before attempting a full built-in alcove with surrounding bookshelves.
Final Thoughts
A well-built DIY reading nook is one of the most rewarding home projects of 2026 — not because it is technically impressive, but because you will actually use it every day. The two most important takeaways from this guide: choose a spot with at least 24 inches of seat depth and invest in high-density foam rather than cutting corners on the cushion. Do both of those things and the rest of the build almost takes care of itself. For more hands-on project guides, explore our full Home and DIY archive, and check our Lifestyle section for design and decor ideas to style your finished nook.
What Do You Think?
Have you built a DIY reading nook — or is one on your project list for 2026? Drop your questions, photos, or tips in the comments below — we read every one. If this guide helped you, share it with a friend who needs a cozy corner of their own.
References
- This Old House — Ideas for Creating a Cozy Reading Nook
- Family Handyman — 20 of Family Handyman’s Most Incredible DIY Projects
- Good Housekeeping / Zillow 2026 Home Trends Report — The Best Home Trends of 2026
- D and G Flooring — Reading Nook Ideas: Cozy Corners for Every Room in Your Home
- LittleNookHome — The Ultimate Guide to Building a Reading Nook in Any Room